Weld Tooling Design Company Introduces New Cost Saving Clamp Risers


Lean Manufacturers Discover Time and Cost Savings in Their Product-Holding Fixtures With Clamp Risers by Rentapen

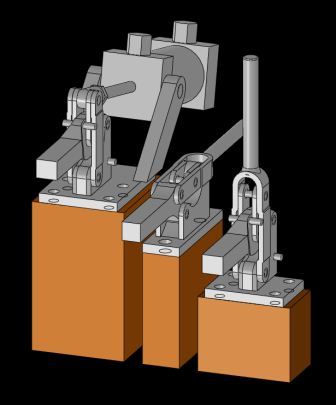
In the beginning of April, 2013 Rentapen Inc. launched new website pages for their line of clamp risers and spacers.  The clamp risers are made specifically for different brands of clamps including: Wolverine, Carr Lane, REID, De-Sta-Co, TE-CO, All American, and Jergens.   Each riser or spacer is tapped and drilled for mounting the designated clamp and uses counter bored holes for mounting the riser or spacer to the fixture or jig.

Rentapen’s design team has been designing and building weld fixtures for over 35 years. They realized they were designing the same clamp risers over and over again.  So Rentapen developed what is now called RAPid Risers™,  a line of tooling components that hold all of the finest brands of part holding clamps.  These standardized yet versatile risers save manufacturers time and money when it comes to the design and build process.

Wolverine Clamps
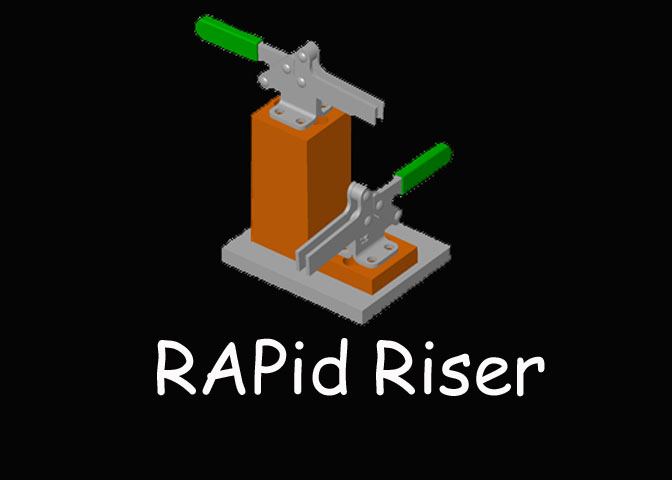
3D CAD Models of the risers can be downloaded from Rentapen’s website along with informational PDFs that detail the design of the RAPid Riser™.

 “By focusing our processes and skilled talent on what we do well, we free-up our customers time, energy, and talent to be more powerful and productive with what they do well,” said Susan Straley,  President of Rentapen.  “That gives them peace of mind and contributes to their success.”

If a designer created a clamp riser from scratch, like Rentapen and all other machine tooling design companies used to do, they would have to go through a timely and expensive process that includes: designing the part; detailing; checking; ordering material; writing the CNC code; creating the part and finally inspecting the part.

This entire process takes about 77 minutes. Manufacturers are now able to download the 3D model from Rentapen’s website, save the model to their library, put the riser into their design, and order the block.   Once the model is in the company’s CAD library, the process approximately takes 4 minutes.  Rentapen’s RAPid Riser™ is saving the manufacturers as much as 73 minutes in design and build time.

 “The RAPid Risers™ are just another way for the fixture builder to save time and money on the design and build of weld fixtures or any other type of fixture,” said, Steve Pautz, Product manager at E.L. Simeth Co. a distributor of the clamp risers.  “The Clamp Risers is just one part of this unique design system that really works. E.L. Simeth Company, as the distributor for this line, has customers that use the complete line so we know that it works very well,”

RapidRisersRapid Tooling Components™ reduce the design cost of the fixture by eliminating the need to design, detail and check similar parts over and over again. Three dimensional computer models are provided by Rentapen Inc. that customers can use to incorporate into their designs.  These modular components are the new standard in weld jig and assembly fixture design.

Rentapen Inc., is the weld fixture specialist, and is home of RAPid Tooling Components. Rentapen Inc. has been providing machine tool design services to manufactures since 1976.  A Certified Woman Owned Business and owns RAPid Tooling Components™. For more information about Rentapen Inc., please call 262-542-8891.

Jig or Weld Fixture Design — Five Items to Consider in V-Block Design

Five items to consider when designing your V-block

In our last Jig or Weld Fixture Design blog we talked about different ways to locate a round rod or tube.   One of the more common ways is with a v-block.

Today we will discuss some of the questions that help you decide the material, modeling method using Pro/E  4.0, and fastener locations.

1)      MATERIAL  —

First decide what material you will need the v-block to be.

How much will the fixture be used?    That means knowing what the product is made of because we need the v-block to be strong enough not to wear down too quickly.  We want to be able to produce lots of product before we have to replace any of the parts in the fixture.    The more the fixture is going to be used the harder you need to make the v-block relative to the product tube or rod.

Do you need to plan for weld splatter?

If the v-block is located near the weld joint, you will need to consider using a metal that the weld splatter will not stick to as easily, or using a weld splatter shield.  Remember that like metals stick better.  So if you are welding steel, you may want your v-block to be Ampco 18 bronze or a hardened steel such as 4140 PH or A2.   If you are welding aluminum, hardened steel may work just fine.

2)      TOLERANCING –

Is the location of the rod or tube critical?

If the tube or rod needs to be located in just the right spot in order to work or assemble easily to the rest of the product parts, then you will want to design in adjustability with shim packs.  You will need to look at the product drawing and also know your customer’s preferences.

At Rentapen we design for many different customers.  So we have to consider the standards and preferences of each customer when we design.  Some of them love to shim every locator in a fixture.  Some of them don’t like to shim at all.   If you are a CAD drafter, you may be working under more than one designer.  Each designer may have their own preferences.  But it is up to you to look at the product drawing and then advise them when you think shims will be needed to meet the tolerances of the product drawing.   Then do what they say, they are your customer.

If it is a rough location, you may be able to use a purchased V-block from somewhere.  Do you have a favorite model or brand you would like to share?

3)      FASTENERS –

Once you have decided if your v-block will have shims to fine-tune its location before going into production, you can decide about the location of the fasteners.  If the tube or rod location is critical, you will need to use dowels to lock in the location.  If it is rough, you can just fasten the v-block directly to the base plate with screws.

4)      MODELING —

Locating the Vee in the v-block.

Here is how I model in the Vee cut.  Click on the video to see my method using Pro/E  Wildfire 4.0.

In this video I dimensioned the construction hole from the BOTTOM of the block.  However, the v-cut may fail if I make an adjustment too big in one direction or the other.  Some of the project engineers I have worked with prefer that the dimension for the V-cut be from the TOP surface of the block.  That way you can change the size of the block without having problems with the cut.

Some like to create planes that intersect at the center where the the construction circle will be located.  These planes are created before you start the sketch to cut the Vee.  I think your preference depends on your experience and how your brain works when making adjustments to parts while in the assembly.

5)      CLAMPING —

Clamping is a whole topic by itself that we will address in a future blog.  I just wanted to note that it is something that you need to think about.  We always clamp down our parts in weld fixtures, even if it is a table mounted fixture and gravity does its work.  You want to be sure that tube doesn’t move when the heat of the weld hits it.


And now I would like to share a couple of things with you.

First, Rentapen’s Holiday Greeting to our customers, vendors, students, and friends.

Second, we are in the news!  Check out the latest news at Rentapen by clicking here.

Till next time!

Susan Straley

The Queen of Lean Machine Design

Does Your Company Encourage Educational Growth?

Manufacturers Utilize Education to Motivate and Retain The Engineering Workforce.

News 2011-12-15

According to the National Science Foundation, Division of Science Resources Statistics, “The majority of individuals in the labor force with Science and Engineering degrees are in their most productive years, (from their late 30s through their early 50s), with the largest group ages 40-44.”

So what keeps these engineers inspired in the work force?

“Education and learning more software is one way to get engineers ready for work force opportunities,” said Susan Straley the President of Rentapen Inc.

As the engineering workforce changes, employers implement retention and training programs. For example, Rentapen Inc., located in Waukesha, Wisconsin recruits and trains engineering interns. Rentapen has also implemented an education reimbursement program to keep their current engineer’s skills updated and their workforce motivated.

One of Rentapen’s design engineers is expanding his knowledge and updating his skills. Curtis K. a CAD Drafter at Rentapen Inc. just finished his Solidworks course at WCTC on Thursday, December 15, 2011.

Curtis has worked for Rentapen for one year and already has furthered his education to keep current with Rentapen’s 3D design services for customers.

“It is very important for a machine design company such as, Rentapen to have their engineers trained in both Solidworks and Pro/Engineer because Rentapen’s customers don’t all use the same software for their machine designs,” said Straley.

Curtis has five years of experience in Pro/Engineer and is beginning to work with Solidworks.

“I felt I needed to take the class because when I start working with Solidworks it will be easier for me to understand the software,” said Curtis K.

Rentapen, a company that specializes in jig and weld fixture design, encourages its employees to take advantage of Rentapen’s education reimbursement programs.   Since Rentapen’s design customers dictate what software they want their machine designs created on.  It is vital for Rentapen’s design engineers to have education in both softwares.

By: Bethany Kratz, Duchess of Cost Reductions

Five Pin Pointers

Weld Fixture 101  – Locating Pins

To recap what was said in the video:

Pointer #1 

You can buy your pins from a catalog or you can make your own.  But don’t use the lock screw design for mounting your pin.  We have found they don’t hold up to the hard use they experience in a weld fixture.

Pointer #2

Harden your pins.  This makes it “harder” for the weld splatter to stick to the pin and easier, then, for you to get the part out of the fixture.  In fact, it is good practice to always harden those components that touch the product parts.  You can surface harden, called “case” harden, or you can full harden, which hardens the part all the way through.  Purchased pins are already hardened.

Pointer #3 

If possible, mount  the pin from the bottom with a screw.   If you can’t mount from the bottom, another best practice is to cut a whistle cut (an angle cut) into the base of the pin.  Then use a set screw to hold it in place.

Pointer #4

When using locating pins in two holes in a product part, use a round pin in the first hole and a diamond pin in the second hole.   The diamond pin will allow for some tolerance variations between the holes in the product.

When I say, round pin, it doesn’t mean that you can’t cut off some surfaces of that round pin as discussed in pointer  #5.

Pointer #5

Other cuts in the pin make it easier to remove the product parts from the fixture.  Square cuts or triangular cuts work well and still have sufficient pin surface to locate the product.

That’s it!  If you haven’t already, sign up to be notified when the next blog on Weld Fixture Design is released!

Now for fun, check out the new video we have from Lashy7 singing our shim king song.