Weld Fixture Specialists Offers New Products to Manufacturers.


Rentapen Inc. Listens to Customers, Makes Alterations To Product Line And Creates Four New RAPid Blocks™

On June 21, 2013 Rentapen Inc. added four New RAPid Blocks™ to their collection of six RAPid Blocks™.  Rentapen Inc., located in Waukesha, WI, first developed RAPid Tooling Components™ in the year 2002.

The RAPid Tooling Component™ product line was inspired by Rentapen’s customers’ need for dramatic reductions in the overall design, set-up, and operation costs of welding and other tooling fixtures. Rapid Tooling Components™ (RTC) reduce the design cost of the fixture by eliminating the need to design, detail and check similar parts over and over again.

 “We found that it was costing our customer $100 to design, check, cut, and create a block.  We realized we could do it cheaper.  With RAPid Tooling Components™, it now costs that customer about $37 for the same block and they don’t have to design and check it each time,” said Susan Straley, President and Owner of Rentapen.  “Our product line saves time in the design and build of product part holding fixtures.”

The new RAPid Blocks™ are RB11, RB12, RB16, & RB19 and can be downloaded for free on Rentapen’s website.  RAPid Blocks™ are standard yet versatile parts that are used with locating pins, rest pads, jig feet, and other parts in a weld fixture.

The new blocks are improvements to a now discontinued blocks; which was limited to only a 3/8 screw size.  These improvements allow the customer to use any screw size (1/2, 3/8, ¼, & 5/16) needed to complete the design of the weld fixture.

The RB11 & RB16 is designed with two drill and counter-bored holes used to screw the block to the plate and one press fit hole to hold a dowel.  In the front of the RB11 there is one round screw hole used for front and back shim adjustability.  The RB16 is designed the exact same way but with one large difference.  Instead of a round hole, it is designed with a slot for optimum side to side adjustability of up to ¼”.

The RB12 & RB19 is designed with three drill and counter-bored holes used to screw the block to the plate and two press fit holes to hold a dowels.

The RB12 and RB19 are designed to be longer, in order to locate other parts and to keep them square on the weld fixture.  Similar, to the design of the RB11, the RB12 has round screw holes used for shim adjustability in 3 directions of up to 1/8”.

RB12 has two oversized holes; located at each end of the block. To solidly hole the subassembly against the RB12 but still is able to allow adjustments in the side to side and up and down directions.  Rentapen created a weld fixture design lesson with slide show to explain better with images.

The RB19 is designed similar to the RB12 but it is designed with a two slots for additional side to side adjustability.

To provide their customers with the best price, Rentapen makes each RAPid Block™ when it is ordered. Keeping finished goods inventory costs low and passing on the savings to Rentapen’s customers.

Rentapen Inc., Weld Fixture Specialists is home of RAPid Tooling Components™ used in weld fixture design and build. Rentapen Inc, located in Waukesha, WI, has been providing machine tool design services to manufactures since 1976.  Rentapen is a Certified Woman Owned Business and home of RAPid Tooling Components™.

6-Questions RE: Locating Pins in Weld Fixture Design


In weld fixture design we often use the holes in the product for locating the product part in the fixture.  What do you  think designers should ask when considering pinning a hole?

Welded Product Parts With Critical Dimensions Tween the Holes


The location of the hole in one product part can be precisely located in relation to the other product parts it is being welded to.  This is done by using the right design methods.


Major design difficulties can occur if some questions are not addressed before starting the 3D modeling process.

What do you  think designers should ask when considering pinning a hole?

What comes to mind for me is:

1) Is the hole location critical to the other parts it is welded to?  If it isn’t it doesn’t mean I WON’T pin the hole, just that maybe I can use a looser tolerance between the pin and the hole diameters, and I won’t need to use an adjustment shim pack to fine tune the locations of the pin.

2) Will you be able to get the product out of the fixture if you pin the hole?   Or, do you have to remove the pin before you are able to remove the product from the fixture?  We will be going over how to use a straight action clamp in weld fixture design for removing a pin in future blogs.

3) Are there other holes in that same product part that are pinned?  You need to take care here because you need to understand that there will be tolerance issues between the holes.  Yet , two holes makes it easy to locate the part at just the right angle.

4) Will you need to rough locate the part before it is pinned so that it is easier and faster for the pin to find the hole, or the hole to find the pin?

Rough Locator

Pink Rough Locator helps position the Product Part


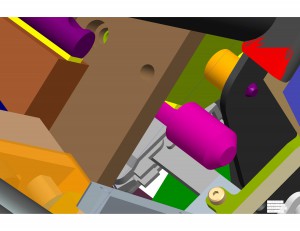
For example, The product parts are dark gray.  In this picture, the pink round part is a rough locator, along with other locators it gets the product part in close proximity to perfect.  Then the removable purple pin with the help of a straight action clamp moves into place to hold the part in the perfect place while it is being welded.

5) Will you use a shoulder pin that can also act like a rest pad?

Shoulder Pins Can Be used as Rest Pads.


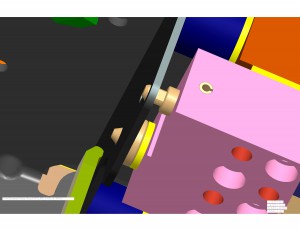
In this picture the left pin is a shoulder pin.  The product plate (in dark gray) rests on the shoulder.  The yellow part underneath it is a metal precision shim pack.


6) How will you prevent weld splatter from making the pin get stuck or welded into the hole?

As you see in the picture, the pins have chamfers on the ends where they protrude through the product plate.  The pins should be harder than the material you are welding.  That makes them last longer in the fixture and reduces the likelihood that the weld splatter will stick to them.  The material of the pin depends on the material you are welding.   In some instances you will need to add guards or shields to protect the pin from the weld splatter.  There is also a protective coating that can be added to protect the pin from the weld splatter sticking to it.

Did I miss some questions?  What else would you consider?

Please share this with a manufacturing engineer or machine builder that you know. We always can learn from the welders, assemblers, machinists and managers who work with our designs every day.

Susan Straley, Queen of Lean Machine Design at Rentapen

Susan Straley
Queen of Lean Machine Design


PS
Do you know someone with some singing or rapping talent? Video tape them singing our Shim King song and we will post it on our shim page and tweet it!